Material Phases:
Austenite
Martensite
Pearlite
Bainite
Material Composition:
Alloying elements and their purpose:
Steel:
- Aluminum removes oxygen, sulfur, and phosphorus from steel.
- Bismuth improves machinability.
- Chromium increases wear resistance, hardness, and toughness.
- Cobalt increases stability and encourages the formation of free graphite.
- Copper improves hardening and corrosion resistance.
- Manganese increases hardenability, ductility, wear resistance, and high-temp strength.
- Molybdenum lowers carbon concentration and adds room-temperature strength.
- Nickel improves strength, corrosion resistance, and oxidation resistance.
- Silicon increases strength and magnetism.
- Titanium improves hardness and strength.
- Tungsten improves hardness and strength.
- Vanadium increases toughness, strength, corrosion resistance, and shock resistance.
Aluminum:
- Boron grain refiner, reduces gas holes, maximizes conductivity lost from Ti & Cr content
- Bismuth improves machinability. Reduces casting shrinkage and cracking.
- Chromium helps control grain size. Increases wear resistance, hardness, and toughness.
- Copper improves heat treatment capability and adds corrosion resistance.
- Iron
- Magnesium increases strength without decreasing ductility. Good corrosion resistance.
- Manganese decreases resistivity, increases strength.
- Nickel improves strength, corrosion resistance, and oxidation resistance.
- Silicon increases strength, magnetism and conductivity.
- Titanium improves hardness and strength.
- Zinc increased tensile properties. Reduced use to stress-corrosion cracking.
References:
Website: https://www.totalmateria.com/Article55.htm
AMS 4482: Cast Aluminum Alloy Composite 4.6Cu-3.4Ti-1.4B-0.75Ag-0.27Mg
Brinell Scale:
Proposed by Swedish engineer Johan August Brinell in 1900.
Drawbacks: Part must be indented in-order to test the hardness – scraps parts.
Equation:
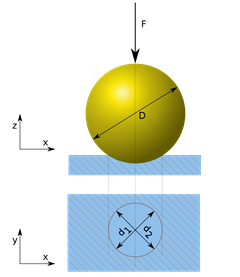
where,
F = applied load (N)
D = diameter of indenter (mm)
d = diameter of indentation (mm)
HBW – Carbide indenter used
HBS – Steel indenter used
Nomenclature:
XXX HB YYD2 , where XXX is the force that was applied (in kgf) and YY is the material type
Material Codes: 05 – aluminum alloys / 10 – copper alloys / 30 – steel alloys
Standards:
- ASTM E10-14
- ISO 6506-1:2005 thru ISO 6506-4:2005
References:
Website: https://www.totalmateria.com/Article55.htm
AMS 4482: Cast Aluminum Alloy Composite 4.6Cu-3.4Ti-1.4B-0.75Ag-0.27Mg
Rockwell Scale:
Conceived by Viennese professor Paul Ludwik in 1908. Requires smaller indentation than the Brinell scale, thus it can be considered nondestructive.
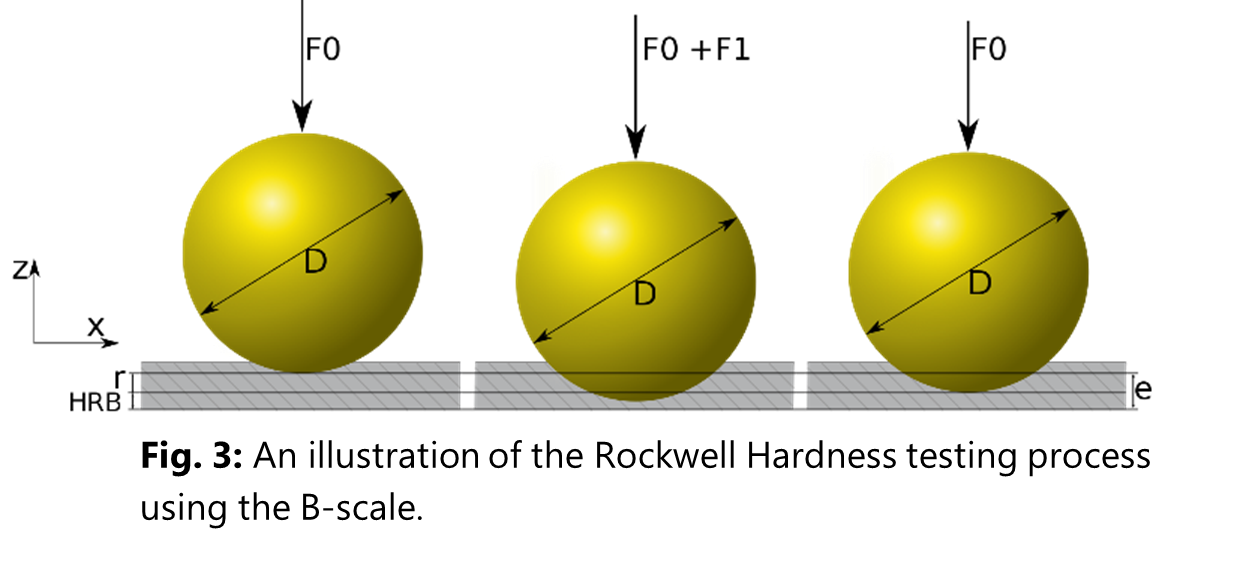
In general, the steps of the Rockwell hardness testing are as follows:
Step 1 – Apply an initial load (F0) – typically 10kgf (i.e. 98N)
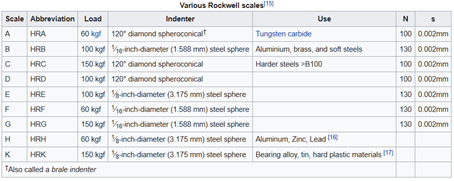
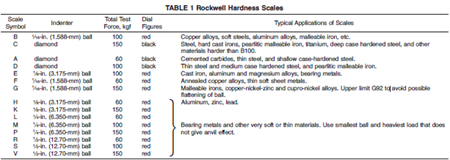
Step 2 – Apply the main load (F1) based on the scale being used (see table 2 below).
Step 3 – Leave the main load for a dwell time to let the indentation process stop.
Step 4 – Remove the main load and measure the new depth at F0
Equation:
where,
N – is a given value depending on the HR scale used (see table 2 below)
d – is the indentation depth, taken from zero load point (see fig. 3 above)
s – is given value depending on the HR scale used (see table below – typically s = .002mm)
Standards:
- ASTM E18: Metallic Materials
- ISO 6508-1 thru ISO 6508-3: Metallic materials
- ISO 2039-2: Plastic materials
References:
- Website: https://en.wikipedia.org/wiki/Rockwell_scale
- ASTM E18 Specification
Shot Peen:
VS 1-1-6-1 (Rev B) Material Specs
Shot peening is a process in which a metallic, glass, or ceramic media is blasted against the surface of a part. The repeated striking of the media (typically referred to as “shot”) against the surface of the part builds up residual compressive stresses within the surface layers of the part. These residual stresses in the surface layers increase the fatigue strength and reduce the risk of stress-corrosion cracking.
Standards:
- ASM 2430 – Shot Peening
- AMS 2431 – Peening Media


